SU uke build : part 06 – Body cut

Bit of a cheat on my part this one. For health and safety reasons, I am not allowed to use machinery at guitar school. I jumped out of an aeroplane last week, at 13,000ft, with zero experience but sadly, I cannot even look sideways at a band saw with out getting the H&S crew smashing down my classroom door.

So, to take the piece of wood from where it was, to a ukulele shape, I em…. let my teacher, Mike, take it home and bandsaw it for me. Not how I wanted it to happen, but for the best at the moment. Thanks Mike…. I can move on now…

image

image

Lidl Electric Uke Hack : part 01 – the plan

Just the other day, I spotted a review of an £18 Ukulele on
Barry Maz’s “Got a Ukulele?” website. He reckons this cheap ukulele from Lidl isn’t that bad. I have been thinking about drilling into a Uke to add a piezo pickup for some time, but really didn’t wan’t to mess up any of my good ukes, as I have never done this before. £18 isn’t the end of the world if things go wrong.

So on Friday, I marched around to Lidl’s and bought this :-

image

Yesterday, while I was in the West end of London, I took another piece of advice from Barry’s review and grabbed a set of Aquila Soprano strings.

Then, I ordered up this kit from a seller called mosong_music on ebay. Ok, so it is in Hong Kong and will take a while to arrive, but £11.77 inclusive of postage was worth a gamble.

And finally, when it is all fitted, I shall be plugging it into my smokey amp (named so as it used to be built inside cigarette packets) :-

SU uke build : part 05 – Acquiring wood for the neck.

Once again I have been incredibly lucky whilst hunting for the parts I need to build the SU. This time my luck was such that I met another electric ukulele builder, and a good chap he is.

Peter Howlett builds some very beautiful nylon strung electric ukuleles. He calls them Uklectic, and they are really lovely examples of luthier craftmanship. Peter also runs ukulele building courses and has put lots of good instructional videos up on youtube. I will run an article on them in the next couple of weeks.

Anyway, I was hunting about on ebay for some mahogany to build the SU neck with, when I saw an advert for ‘Quartersawn mahogany guitar neck blank – brick red, dense, nice long length. Tight even grain making stacked heel invisible’. The description went on to say ‘South American mahogany is rare. Quartersawn is even rarer. This blank is 890mm long x 80mm wide x 25mm thick planed one side. It is cut on the perfect quarter so when making a stacked heel you will get an almost invisible look. This is a Brazilian variety which tends to be redder than the pink Honduran/Belize stuff. It is very dense and will take a crisp shape. I have 35 more lengths mostly on the absolute quarter with the same vertical grain to the face side when viewed end on.’

At £10.99 I couldn’t stop myself reaching for the ‘Buy it now’ button, and actually after some email exchange with Peter, ended up buying 2.

Peter says in the description he has more, but at the time of writing, I cannot see any listed in his ebay shop. If you are hunting, you could always try to contact him via his website though.

My pieces arrived this morning, and they do look very good :-

SU uke build : part 04 – The bridge problem

Here is a tricky party of the build. Every steel string electric ukulele I have seen uses a Fender Telecaster style bridge. I am build a Gibson style Uke… I want a Gibson SG Tune-a-matic style bridge and tailpiece. Nobody makes them for 4 string instruments. It is fundamental to the design as well. Fenders have straight necks, Gibsons have a slight angle on their necks. It is the way the bridge works that decides which way the neck should be.

I have bought 2 different types of bridge from Hong Kong using ebay. These were cheapest, I can study their design and draw up my own in CAD and see if I can find somewhere to make me some. Screws and fixings I can reuse from the ones I have bought. Here they are, the first set of pictures show the traditional 2 piece bridge. This one looks easiest to replicate, but of course, is 2 pieces and will take up more of the uke body.

This next one is a single piece version. It is more complicated but will save precious space on the face of the uke.

I am going to draw up both and send the drawings along with the parts away for machining.

SU uke build : part 03 – More bodywork

After the glue did it’s job, I ended up with a single piece of wood. Ok, it had really small ridges at the joins, but it is definitely a single lump. This is good.

I was busy trying to level out the seams with a scraper, when my instructor spotted me. He very quickly jumped in to help me understand how I could get better results. It turns out that a scraper is useless. Unless of course it is backed up with the other relevant equipment.

The 3 things you need to make a scraper work properly are :-

  • A whetstone or a sharpening block
  • 3-in-1 oil
  • A burnisher

The technique seems easy enough but it makes a huge difference for sure. I am sure it applies just as well to other tools that you need to make sharp. I was thinking how best to describe what I had learnt, when I came across this guide to sharpening and using a scraper at www.stewmac.com.

Beyond that, Stewmac have lots of info for luthiers and parts you cannot find anywhere else 😉

Now my mahogany body is glass smooth and looking nice.

You can still see the holes from where it was salvaged, but you will note these are around the edges and will be removed.

Next up, I will be drawing on a template pattern and cutting the block to shape.

SU uke build : part 02 – Beginning the mahogany body

Gibson SG’s generally have a solid mahogany body and neck, so it seemed logical to use mahogany for the SU’s body as well. The trouble is, mahogany is expensive stuff. At the time I am writing this, a electric guitar blank in mahogany turns in at around £60. Yikes.

I was lucky, as a kind gent on my luthier course had some ‘scrap’ mahogany that he gifted me (thanks Tony). It came as a single plank, and it had a few holes in it. The ends even had some broken screws in them, but with some careful selection cuts and joins, these bits will all end up in the waste bin. As I had already drawn up plans, I knew the dimensions and which areas I could afford to have the waste holes in.

I sawed the plank into three parts, which my instructor, Mike, took away to machine plane for me, as we don’t have access to machinery at the college. A week later, the 3 flat pieces where back with me and I proceeded to glue them together and clamp them up tight. The clamps are known as Bar Clamps, and they helped pull the three pieces of wood together. I had some cheap metal scrappers that I picked up in a discount pound shop that I used to remove the excess glue that seeped out.

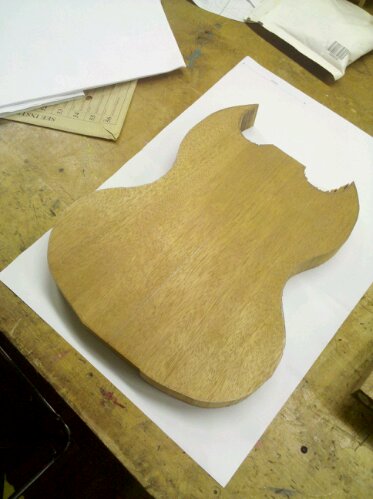
Next time, I will show you how the ‘body’ looked after I removed from the clamps, and go through what happened next.

Tearcaster uke build : part 01 – Plans

Before starting any ukulele build, your going to need to get a plan!

I got my plans from Michael J King, who sells a sets of either printed plans or PDF plans delivered by e-mail. The plans are for a steel strung electric ukulele. You can chose between soprano, concert or tenor scaled necks when you build. I am going to go for a soprano sized neck for this Uke. Although the body shape is different, the build principals for this uke resemble that of a fender telecaster or stratocaster. The neck is bolted onto a one piece body with either one or two single coil pickups and a fender style bridge/tailpiece. I could have used strat 6-string parts for the bridge and pickups, but for the best look, I think dedicated 4 string parts should be used. All the other techniques used for the build can be researched in a electric guitar builders book.

I will be calling this my ‘Tearcaster Build’ and hopefully when it is finished I will have built something that looks like one of Michael’s own Ukes.