What is U-bass?

The term U-Bass is a relatively new one, owned by Kala. It is there trade name for their 4-string full range bass ukelele. It has a half-scale neck that measures 21″ that uses special polyurethane strings reproduce the sounds of a full size upright bass. The ‘u’ part of the name stems from the fact that it is built around either a solid or an acoustic baritone ukelele body. It can be bought either as a 16 frets (with the neck meeting the body at the 12th fret), fretted or fretless model.

On Sunday evening I was lucky enough to meet Paris from The Pukes and she let me have a look at her solid body u-bass. We suspect that it might be the only solid body u-bass in the U.K. at the moment, but if you know of any others, we would love to hear from you. Please leave a comment below.

Paris reckons it plays really well and the short chance I got to play, it felt nice in my hands. The strings didn’t feel at all sticky, (see the Ashbory below for more on that) but I didn’t get a chance to plug it in.

Paris was also kind enough to flip the u-bass over and let us take a little look inside the preamp cavity. You can see in here a small CR-2032 battery, the same kind that is inside the pre-amp of my Kala Tenor uke. In the years I have owned that uke, I have only ever had to change the battery once or twice and they are available all over the place now. Our local 99p shop sells 5 for a pound 😉

So Paris has the only solid body we know of, but we did see this acoustic version down at John T’s Shopand we were very impressed with that. It is smaller than a guitar, but has a warm acoustic sound like a upright bass.

I had played a Ashbory DeArmnd short scale bass a few years ago. Like the u-bass, this half scale unit was a light weight, poly-stringed bass and I guess in many ways it inspired the newer u-bass. When I played this, the strings were a little sticky, but it was perfectly playable. The company Ashbory is now owned by Fender.

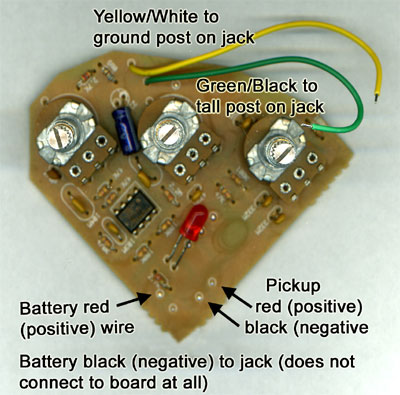
It also has a little pre-ap built into it’s cavity which you can find pictures of below.

You can download the schematic for the Ashbory’s preamp from largesound. I think this could be a very useful schematic for any nylon string uke pre-amp you might be building.

Telecaster uke build : part 07 – Primer, paint, and clear coat

I applied a nitrocellulose primer to the sealed wood body. 2-3 coats were needed. Any slight bumps were sanded flat with 1000 grit sandpaper.

The “Midnight Wine” color coat went over the primer.  This color started to worry me.  I said to myself, “I don’t want a plum colored electric ukulele”.   I pressed on, knowing that if I hated the color, I could always repaint. I did about two coats, then noticed that my overzealous painting had cause a couple of sags on the back.  After letting it dry for a day, I used some 320 grit and then some 1000 grit sandpaper to reflatten the surface.  I sanded just enough to correct the sags, but not enough to sand through all of the color coats.  Once I was pleased with the surface, I did two more color coats.

Next came about 6 or 7 clear coats.  Clear gloss nitrocellulose lacquer was used. After the clear coats were applied, I noticed that the color had changed slightly.  It had become much closer to the dark, rich “Midnight Wine” color that I was expecting.  This pleased me exceedingly.

Filling the grain, sealing the wood, applying the color coats, and then putting on the clear coats, makes for a nice finish.  Even if you are using spray cans (like I do), you can get great results.  I follow the Stewart-MacDonald Nitrocellulose Finishing Schedule.

The next step is the most agonizing for me.  Waiting.  It is recommended that you allow 10-14 days for the finish to cure before wet sanding and buffing the finish.  I’m planning on waiting two full weeks before touching the body again.  It will be hard, but I will be strong.  Hopefully my patience will yield a beautiful, glossy finish.

The PUKES @Boston arms,Tufnell Park 5/3/2012

As Promised, last night I went all the way up to Tuffnell Park to see a band called ‘The Pukes‘. Well, I say ‘band’ but that really does not do them justice. They are more of a ‘punk ukulele collective’ or, to use their own terminology ‘a ukulele anti-society for punks’.

I am guessing, but I would hazard a guess that there were around 15 or more people on that stage thrashing the guts out them little Ukuleles. Mostly ladies, mostly with different colored hair. Mostly tattooed. Totally a spectacle to be seen.

I have been talking to Clara from the pukes over email for a little while now. She sent me a list of their gigs a while back (see the events calendar for their next gig). Now there a few guys in my office over from New York for a few weeks running training courses. One of them asked me if we could go to a punk gig, and I remembered Clara had told me of this gig, so I took my New York workmates up to Tuffnell Park. They couldn’t believe what they saw. The pub was full of leather jackets, bright coloured mohawks and big boots, but my New York mates just couldn’t understand people looking like that but still able to ask them ‘scuse me, mate when they wanted to get past. Apparently, New York punks have much lower standards etiquette than London punks.

So the Pukes rolled through a great list of 2 1/2 minute punk standards that, although admittedly never written for ukulele, belonged on the 4-stringers, if they belonged to be played at all. Further more, every member of the band and the crowd enjoyed what was going on. If you play Uke yourself, you will most likely know that sub-conscious grin you get when you play a tune on it, and you know that by all the rules it just should not work, but it does. That exact same grin permutated through the crowd. Even the most hardened punks were bouncing.

Of course, if that wasn’t enough, to top my evening, I went back stage to meet the band, and I was also lucky enough to get a quick play on what we think might be the only solid body Kala U-Bass in Britain at the moment. It’s owner, Paris, was kind enough to let me take some photos of it, but I am going to save most of them for another day. These U-basses need further investigation, and I know just the website… stay tuned!

Want to try punk uke yourself? Download ‘The Pukes Punk Songbook‘ now!

[style-my-gallery css=”max-width:500px;margin-top:30px;”]

Winter of Discontent punk fest with SUBHUMANS / PUKES’s

If your in London this weekend, don’t forget this gig tomorrow night, I will be there and so will ‘THE PUKES‘ :-

SUN 4 MARCH BOSTON ARMS, Tufnell Park
Winter of Discontent punk fest with SUBHUMANS/ PUKES’s on 7.30pm/ £12

The Pukes
WHEN: March 4, 2012 @ 6:30 pm – 11:45 pm
WHERE: Boston arms
Tufnell Park
London Borough of Islington,London N7
UK

COST: £12

Telecaster uke build : part 06 – Bridge and first assembly

My four string bridge arrived in the mail, so I was able to drill the holes for the screws and strings.  The holes for the strings go all the way through the body.

I used a long drill bit to drill a hole from the bridge to the control cavity.  I will run a wire through this hole to ground the bridge.

A long drill bit is nice to have.  It’s difficult to use a regular length bit and still get the desired angle without rubbing the wood with the drill.

On the back side of the body, I countersunk holes for the string ferrules.

The cutting, shaping, and drilling are now complete.  Before painting, I like to assemble the major components on the instrument.  This gives me confidence that all of the parts will fit together.  If something needs to be adjusted, it’s much easier and cleaner to do it now.

Now that the body has been sealed, it is ready to be primed, painted, and clear coated.  Midnight Wine paint will look great on this.  (I’ve already given the maple neck a clear nitrocellulose finish, so it’s ready to go)

Stratocaster electric ukulele : planning ( how to plan a ukulele build )

I always start of by first drawing or making some ukulele scaled  templates in the desired shape , then you can take the measurements of the parts you are intending to use and see if everything is able to fit on the ukulele .

once you know everything is going to work and fit  you would have to look at some tools and how much you want to spend on wood and parts I prefer you get a some sort of saw that can cut out the shape of your ukulele ( such as a jig-saw , scroll saw or bandsaw ) you should also definitely need a router , any type should do …unless you are a real handyman and you feel like chiseling out all of the cavity’s by hand ….also some clamps and viles can come in handy as well )

now for wood , it’s really up to you …I chose to use very cheap pine because i am very new to this and  I didn’t want to mess up a 50$ piece of wood ( but for my future builds I well definitely look at some hardwoods )

and for electronics  …. this is also something that you should choose by your own personal preference but you should definitely have a pickup and  output jack on your ukulele (and a volume control is nice to have too )

and then there is some stuff that’s really necessary for you ukulele like : bridge and tuners , you can get all of these parts in guitar building stores like http://www.stewmac.com/ and I got a special 4-strings electric ukulele bridge from ‘bezdez’s e-bay store’ for very cheap ( I’m not making commercial for all this , I’m just trying to give you some examples )and then you can pretty much start the project


example for templates


(here is what I mean with making those templates)

Welcoming Tibo

Hey, we have just signed one of the brightest young stars of the electric ukulele scene and we are proud enough to let you know. Tibo is a 13 year old from Belgium and already he has built a great electric ukulele stratocaster, down below, and we thought you might like to hear more about what he is working on next. We are hoping he can bring some of the things he learnt along the way to http://ukeland.co.uk and he is happy to talk about the work he has done with you all.

Fretting over Ukulele Necks

Have you ever heard the phrase about knowing just enough to be dangerous? That’s me that is!

“Kung Fuke!”

Last month I made the decision to make myself an electric ukulele. It’s not something I’ve ever done before but I thought that it might be fun to give it a go.

Ever since then I’ve been fretting over the ukulele neck part of the build. Whilst I know that I could easily buy one, I’d really like to make my own. And being a long-time guitarist I kind of know just enough about guitar necks to realise that there may be more to this than meets the eye.

Continue reading