This is Bobby from the Indonesian band Marjinal playing ‘Negri Ngeri’ on my Risa Tenor stick. It is an Electric uke made to travel that I took with me to show Bob when I visited Jakarta earlier in the year, Bob was really good to me, we spent the whole day together, he showed me around, talked about the street kids and music and how different our relative places in the world are. Thanks Marjinal, you ROCK!
I’m not sure that I have the patience to be an expert painter. I’m not sure that I have a gentle enough touch to be an expert painter. In my last post I talked about some of the challenges I’ve been having painting the body of my electric ukulele. I’d had a bit of a nightmare with the undercoat, but things seemed to be looking up. I closed off having applied the red finish and having left the body to hang for 24 hours. Have you been wondering what happened next? Read on…
So I’ve been racking my brain trying to figure what my first ukulele project should be. There are lots in this site that I’d personally love to own, but you only get one first time. I am silly that way and think if you’re going to do some new adventure, a lot of thought should be put into it long before any materials are picked up. So far the bits that I do know that I’d like:
1st I’d like to practice without feeling self-conscious about others hearing me. The travel ukulele would fit the bill but I’d have to figure out some amplification solution, iPod or otherwise. For me that’s just more things to carry. The bass ukulele has the internal preamp I’d like. So I’m guessing I will go with that.
Next I have to figure out a body style. I’m old school and think a cool rocking look would be awesome. Ideas I’m considering:
So ya, I’ll have to narrow that bit down.
Next I’m considering if there is a preamp, couldn’t I have a speaker set in for when I want to show off what I’ve been practicing? Perhaps hidden by fabric, but the concern is that it could cause distortion if the pickup is sensitive to the vibration. Would like a bit of feedback regarding if this is possible.
Throw me your thoughts and I’ll start looking for the hardware that I know I’ll be using.
My mate scully is quite the genius when it comes to electronics and biscuit tins. Here is a video we just made of his brand new canjolelel / electrolele / futulele / iUkelele / tabulele / phoneulele / ukulele hero machine.
It is made with a Cadbury’s biscuit tin, a plank of wood, an iPad 3, an iPhone 4, and a bit of masking tape. Oh… and a funky bit of software called futulele which runs on both the ipad and iphone and connects them together to act like the neck and the body of the uke.
It is possible that this is the silliest future ukulele ever built! Hooray… watch out for when he has learnt a song or two more, only on ukeland.co.uk
Earlier this week I heeded Daniel Hulbert’s sage advice and decided to test out the wiring on my electric ukulele build. You will remember that I was being a right smart-arse refusing to test until I’d painted the body. Perhaps it was the paint fumes talking? What would you say if I was to tell you that having tested the bloody thing, that it wasn’t working? Yeah, I know… what are the odds of that!
It is with great joy that we are able to introduce AWOL to our team. He will be bringing us ukulele news from far and wide to keep us up to date with everything ukulele! 4 strung is for warned :-
So before I bring a new perspective to Ukeland, perhaps I should introduce myself. I’m AWOL, yes as in not being where I should have been. That long story however is not about ukes and therefore probably of no interest to you.
My fascination with this wonderful little stringed instrument came from my wife. Who after hearing my life regret of never learning to play music insisted I get an instrument and learn (the ‘it’s never too late’ speech). With a gleeful new outlook I ran to the first place I figured I could get a guitar, craigslist. Nothing fit my meager budget. BUT… there was a 30$ ukulele. Humm I knew that it seemed too good to be true, even figured there was a mistake. Called the dealer and arranged to drop in. Turned out it was a new but slightly flawed ukulele that he couldn’t sell to an outlet and this was why it was so cheap. I snapped it up and was beaming. It didn’t take long to notice people with guitars on the trains and buses and how cumbersome it looked compared with my new little bundle of sound. How if I were to travel I could have mine as carry on vs stowed away. Oh the reasons for why my choice was so perfect were really stacking up. A few cheap lessons and I knew some chords and was playing a few songs.
Now I’m the guy behind ukulele army as well as a few other ukulele adventures. Soon I’ll even be taking on some of my own electric ukulele builds and sharing the experiences with the readers here.
I’m looking forward to sharing more ukulele adventures soon…
I’m back with another installment in my story about what it takes to build an electric ukulele. Pretty much all the fiddly stuff is done. In my last update I talked about wiring up the electrics. Daniel Hulbert has suggested that I check that it works before I go too much further. Thanks Daniel… I will do that soon… I promise! Not before I’ve painted the body though! Ha ha! Catch me if you can!
In search of inspiration…
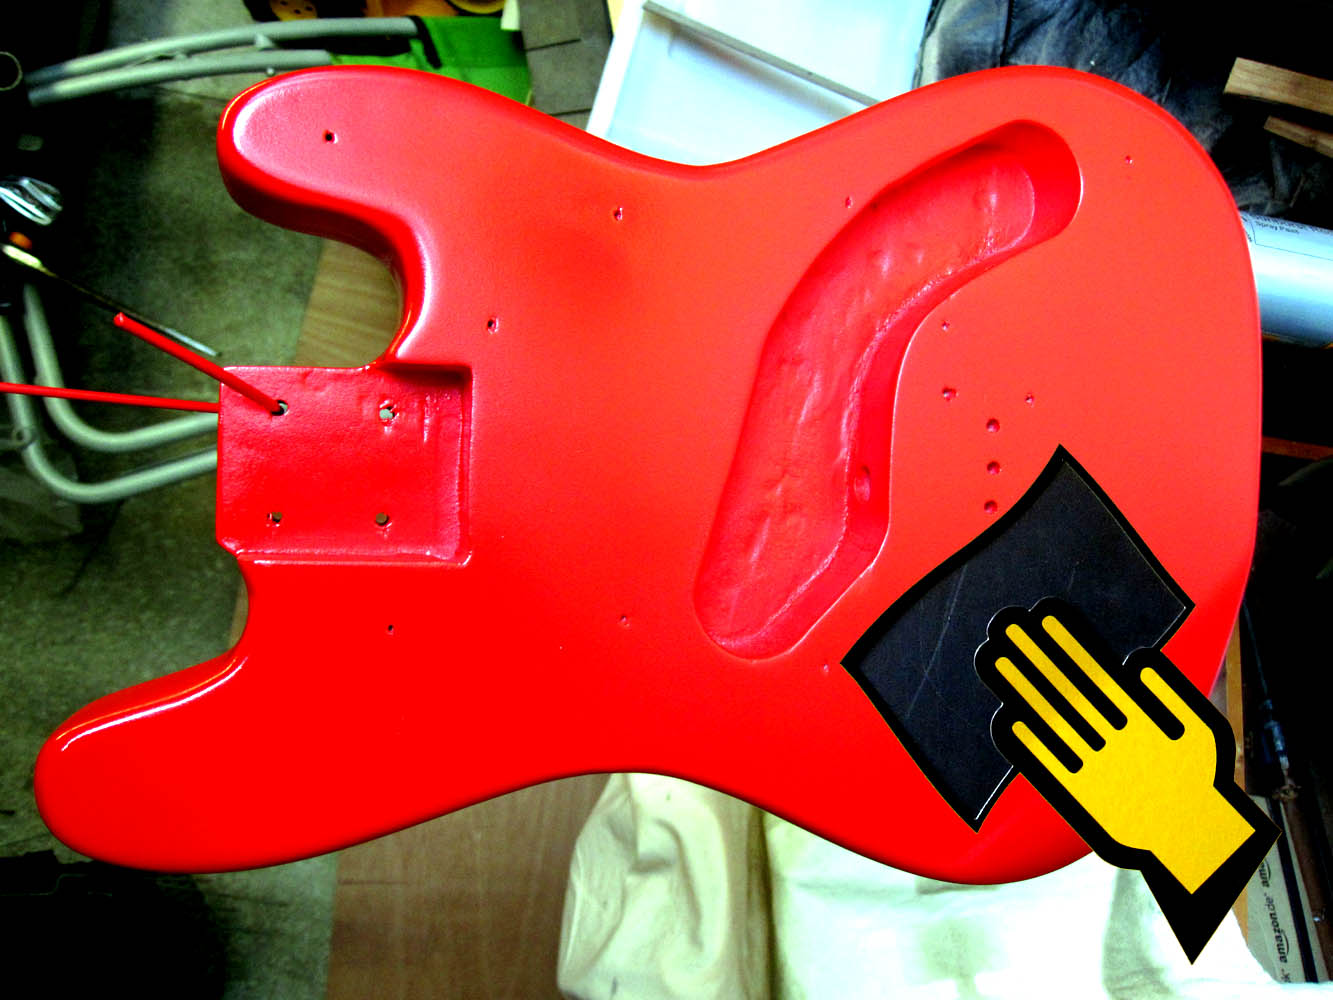
I wasn’t looking forwards to the wiring, and I haven’t been looking forwards to the painting. I’ve done a bit of this before and the results were poor. Granted some of this was simply down to a lack of patience but I knew this time that I needed help. I hit Google+ hard and before I knew it the advice was flowing in thick and fast. Many thanks specifically to Gavin Scully and Jonathan Martin for your words of wisdom. I couldn’t have done this without you guys! But before we start high-fiving let me reveal that this hasn’t all gone according to plan. Let me explain…
The body was given an orange color and a clear coat.
An extra long locking clamp (e.g. a non-medical hemostat) was used to thread the wires through the body. The preamp cavity was narrow and deep, so this tool helped out tremendously.
I originally thought that the rod piezo would be tucked into the space at the back of the bridge. After some testing, this setup wasn’t working as well as I wanted it to. The weight of the wood and the bridge dampened the sound too much.
After putting the rod piezo right behind the string saddles, the sound was much more responsive.
The neck was attached with an oval jack plate. (This seems to be a signature feature of my electric instruments.) A strap peg was placed in the middle of the plate.
The battery compartment was installed in its place at the bottom.
The smaller preamp and the battery holder work together to make a great setup for this bass ukulele. There are no onboard volume or tone controls, but those things are easily controlled on the main amplifier.
This bass ukulele turned out great. I was worried about my color choices when I started out, but I think it looks awesome.
This little ukulele also produces nice sound. The Road Toad strings have a really nice feel to them, and they help make sweet music.
I met all of the goals that I had for this project. I now have a slick little instrument with great sound and looks to match. This project was a rousing success!
Check out the deep and rich sound that this little bass puts out.
To see more of my videos, subscribe to my YouTube channel (Circuits and Strings).
A group of friendly street punks in Indonesia’s capitol, Jakarta.
We had heard the punk ukulele scene in Jakarta was big. We bumped into these punk kids the first time we went out for a walk around and they were happy to let us record them playing uke. In the few days we were there, we meet more new ukulele friends than you ever could have expected. It seems a uke to these kids is like a PSP or a blackberry is to kids in the UK. It gives them amusement, entertainment and above all, a voice to tell everyone else about how they see the world.